This article will guide you through creating a fully customizable Business Card QR Code in HighLevel. You’ll learn how to build a sleek digital business card that makes sharing your contact details easy and efficient, perfect for networking, promotions, or client engagement.
TABLE OF CONTENTS
- What is Business Card QR Code?
- Key Benefits of Business Card QR Code
- How To Create a Business Card QR Code
- Customizable Design
- Operating Hours Display
- Frequently Asked Questions
- Related Articles
What is Business Card QR Code?
Business Card QR Codes in HighLevel let you create a mobile-friendly digital card that can be scanned and saved instantly. Instead of handing out paper cards or having people manually type in your details, you can share one sleek QR code that includes your contact info, logo, hours, and even social media links, making it easier than ever for people to connect with your brand.
Key Benefits of Business Card QR Code
This feature streamlines networking and enhances brand presentation by letting you generate digital business cards accessible via a simple QR scan. Benefits include:
- Dynamic Business Card Generation: Easily select the “Business Card” QR type from a diverse options list.
- Customizable Design: Personalize colors, logo, background transparency, and more to match your branding.
- Complete Contact Details: Integrate phone, email, website, address, and company information all in one card.
- Operating Hours Display: Incorporate your weekly business timings with individual day toggles.
- Social Media Integration: Add links to your Instagram, Facebook, LinkedIn, Pinterest, and other profiles.
- Live Preview: Instantly see how your digital card appears to users before finalizing the design.
How To Create a Business Card QR Code
The Business Card QR Code builder in HighLevel lets you create a professional, scannable digital card that instantly shares your contact information. Follow the steps below to build and customize your own.
Step 1: Access the QR Code Builder
Log in to your HighLevel sub-account.
From the left-hand sidebar, click Sites.
Under the Sites section, click on QR Codes.
Click the Create QR Code button.

Step 2: Configure QR Code Details
- Give your QR Code a name (e.g., "My Digital Business Card").
- Select Business Card as the QR code type.
You will see a live preview of your digital card on the right-hand side.
- Click Next to proceed.

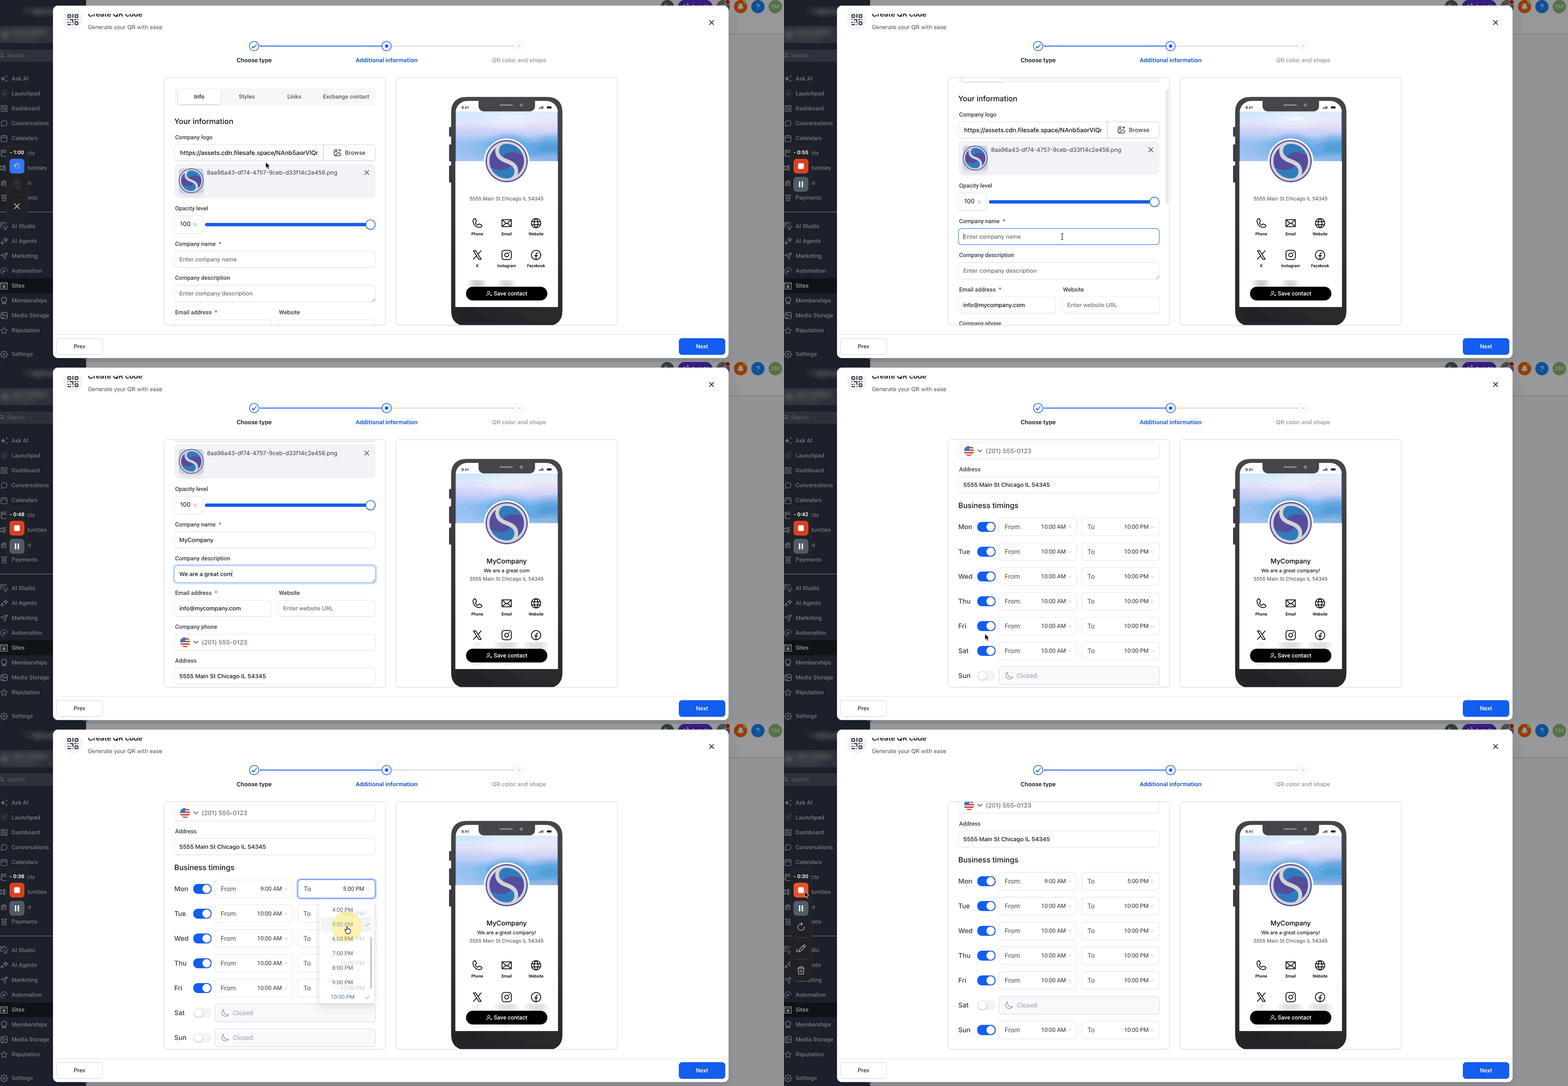
Step 3: Enter Your Business Information
- Click Browse to your company logo then select the opacity level (%).
- Enter your company information including:
- Company Name
- Company Description
- Website
- Phone
- Address
- Use the toggle switches to mark which days you're open or closed. By default, Sunday is toggled off (closed). Set the open and close times for each day you're operational.
- Once all information has been added, click on the Styles tab at the top.
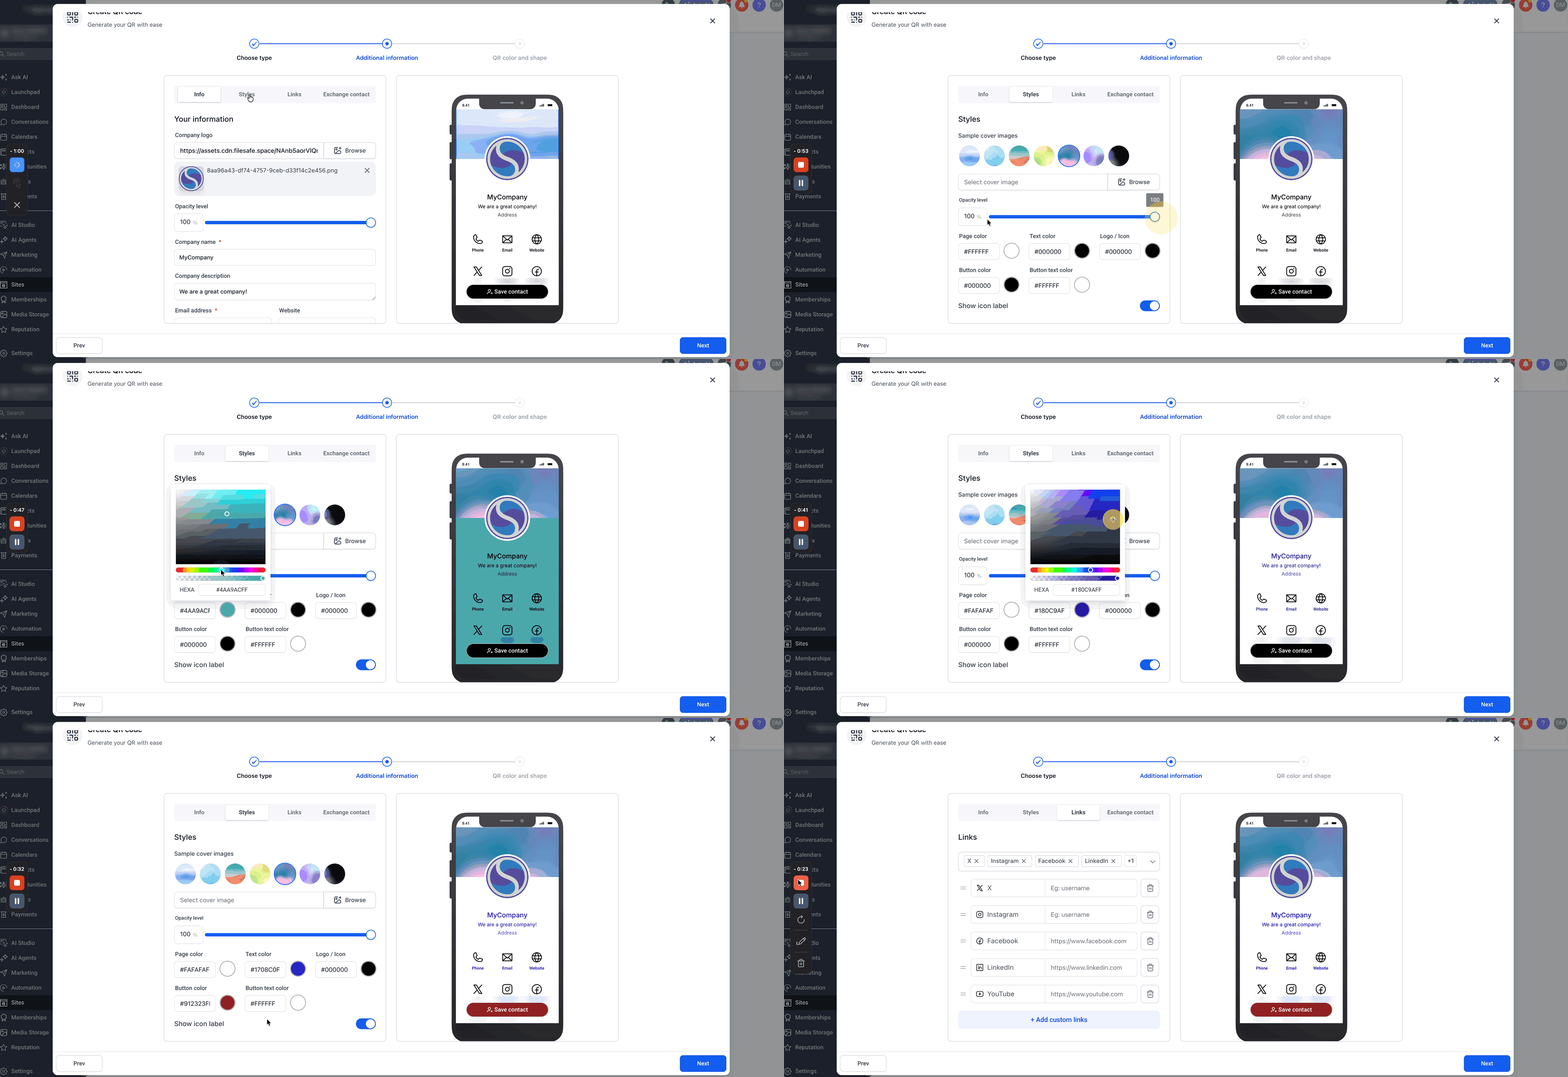
Step 4: Customize the Style
- Select one of the available cover-image templates, or click Browse to use a custom image. Then select the opacity level (%).
- Use the color picker to select a color for the page, text, logo/icon, button and button color.
- Turn Show icon label on to display labels such as Phone and Email, or turn it off for a more minimal design.
- Once all customizations have been set, click on the Links tab at the top.
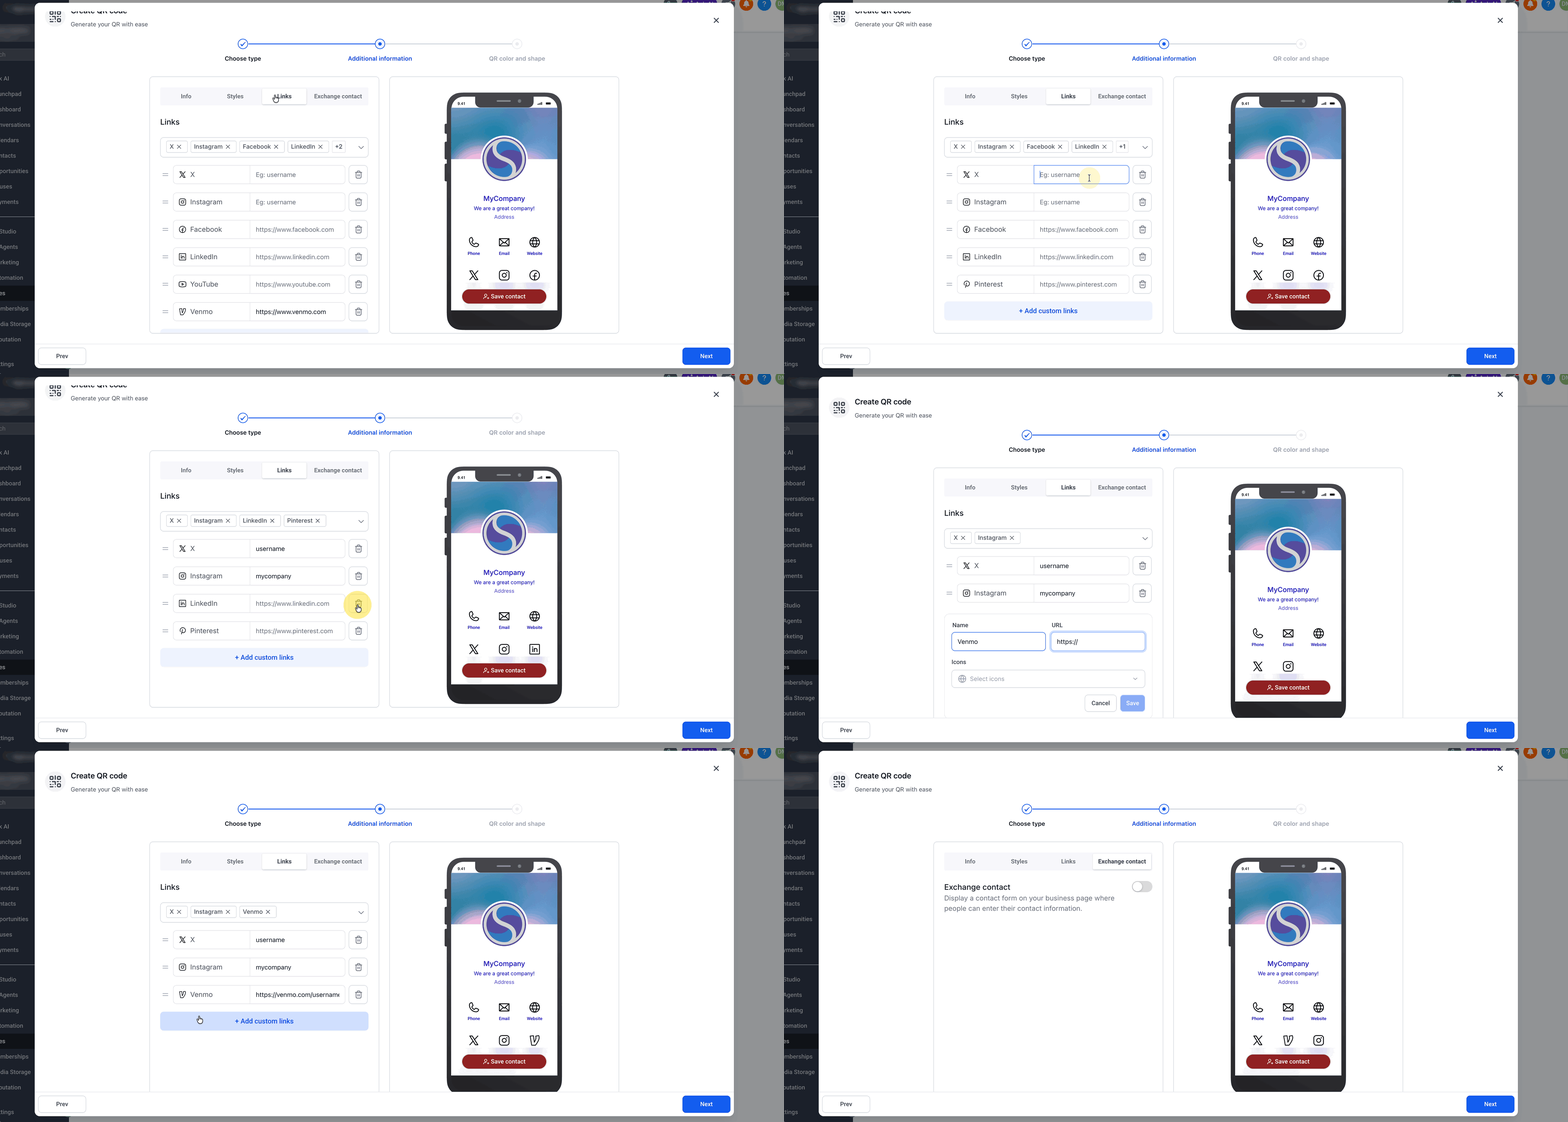
Step 5: Add Links
- Select built-in social links, such as X, Instagram, Facebook, LinkedIn, YouTube, TikTok, or Pinterest, then enter the corresponding URL or username.
- To add another destination, click Add custom links, enter the link name and URL, and choose an icon.
- Use the drag handles to reorder links or click the trash icon to remove a link.
- Once all links have been set, click on the Exchange Contact tab at the top.
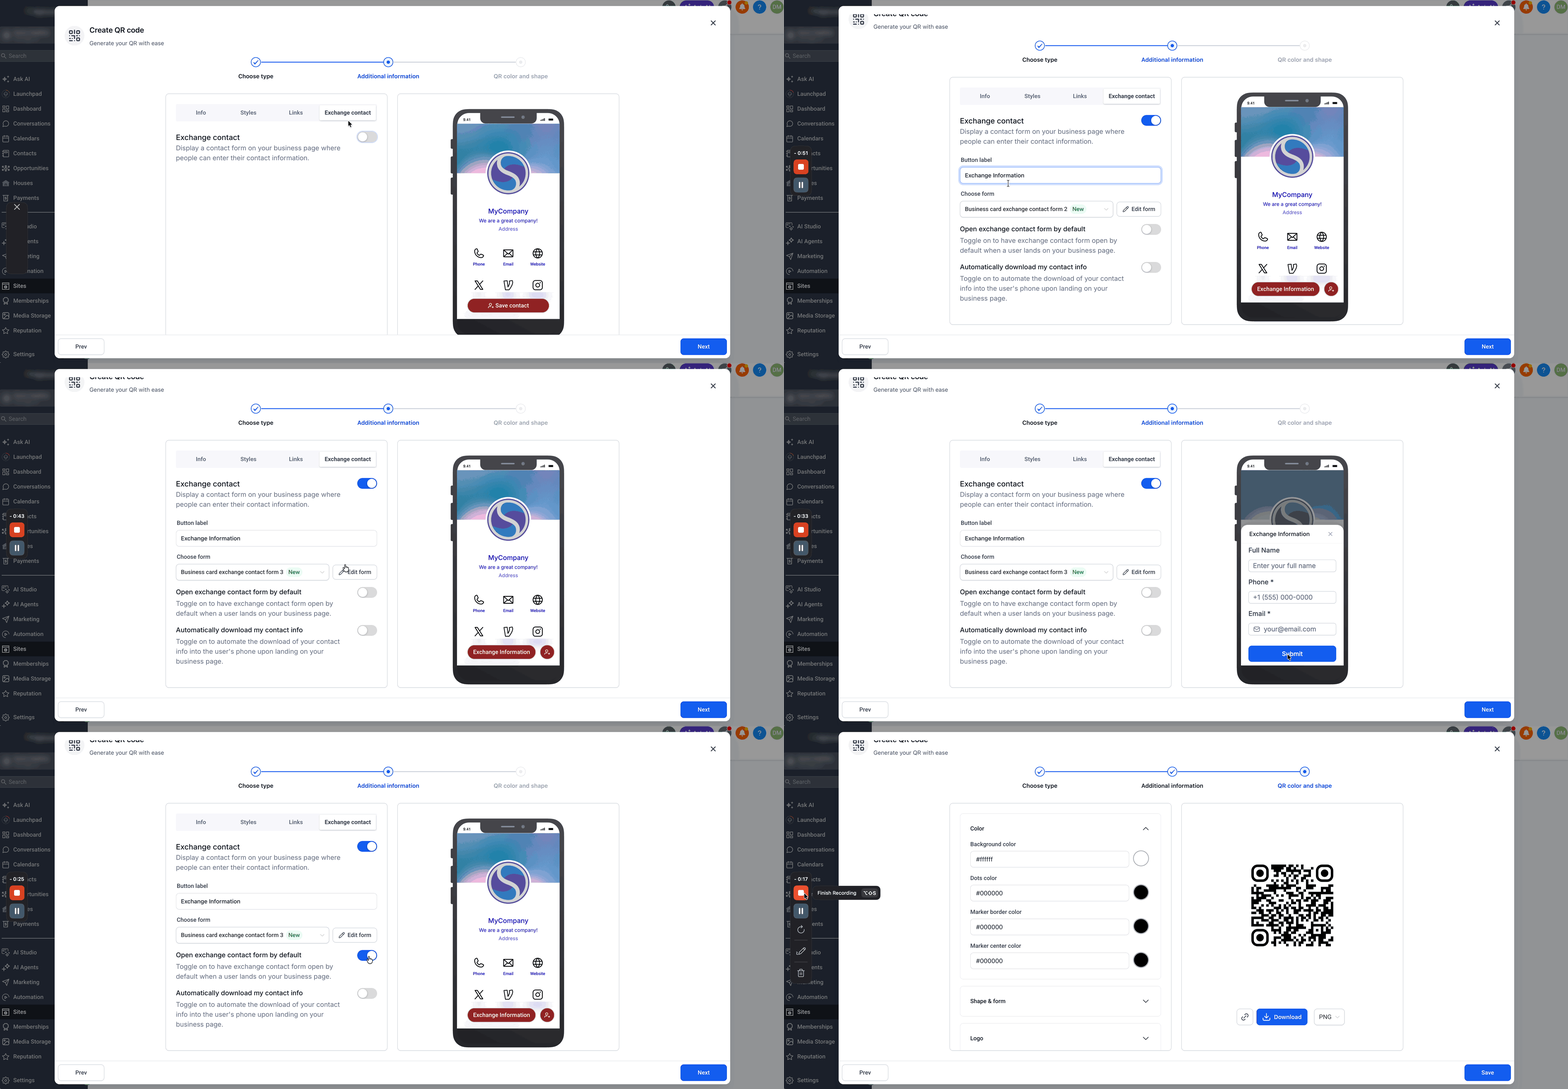
Step 6: Exchange Contact Settings
Exchange Contact turns your Business Card into a lead-capture tool by letting visitors submit their own contact information. When they complete the form, a new contact is created in the CRM and the activity shows that the lead came from the Business Card.
- Open the Exchange contact tab and turn on Exchange contact.
- Choose New form to create a form for the card, or Use an existing form to select a HighLevel form you already created. Click Edit form to update the fields, styling, or form settings without leaving the QR Code Builder.
- Customize the Exchange Contact button text as needed, then review the button and form in the live preview.
- Turn on Open Exchange Contact Form by Default to display the form when the Business Card opens.
- Turn on Automatically Download My Contact Info to begin the contact-saving experience when the page opens.
- Once all settings have been set, click Next.
Step 7: Customize the QR Code Design
- Customize Background Color, Dots Color, Marker Border & Center Color.
- Choose Dot Styles for the QR and customize Marker Borders and Centers.
- Upload your own logo or use a preloaded icon (e.g., Google, YouTube, WhatsApp).
- Enable or disable Remove Background Behind Logo depending on your preference.
- Upload a background image for the entire page.
- Adjust its transparency using the slider.

Step 8: Download and Save
- Choose your download format: PNG, SVG, or PDF.
- Click Download to save your QR code.
- Click the Save button to save the QR Code to your HighLevel library.

Customizable Design
Customizable Design gives you full control over your digital business card’s appearance, ensuring it aligns with your brand identity.
- Adjust background colors and transparency to suit your branding.
- Upload your company logo to create a personalized look.
- Real-time design preview available to see your adjustments as you make them.
Operating Hours Display
The Operating Hours Display feature accommodates businesses with varying weekly schedules.
- Toggle on/off for each day to display accurate operating hours.
- Sunday is off by default, ideal for six-day work weeks but can be turned on if needed.
- Simple interface to input and adjust daily timings effortlessly.
Frequently Asked Questions
Q: Can I edit a Business Card QR Code after it's created?
Yes, you can return to the QR code details and make any necessary changes after generation.
Q: What happens if I do not want to display Sunday’s hours?
Sunday is toggled off by default, making it ideal for businesses with a six-day work week.
Q: Is it possible to add multiple social media links?
Absolutely, you can add a variety of social media profiles including Instagram, Facebook, LinkedIn, and Pinterest.
Q: Will the QR code work on all mobile devices?
Yes, the QR code is designed to be mobile-responsive and works seamlessly across various devices.
Q: Will the QR code work on physical printouts?
Yes! The generated QR code is high resolution and can be used on flyers, business cards, event booths, or even store signage.
Related Articles
Was this article helpful?
That’s Great!
Thank you for your feedback
Sorry! We couldn't be helpful
Thank you for your feedback
Feedback sent
We appreciate your effort and will try to fix the article