This article walks you through connecting a dedicated sending domain to LC Email using Google Domains as your DNS provider. You will add 5 DNS records in total: 2 TXT records, 2 MX records, and 1 CNAME record.
You can set up either your root domain (companyname.com) or a subdomain (e.g. replies.companyname.com). If you already use Google Workspace for email on your root domain, you must use a subdomain instead.
Add Your Domain in Email Services
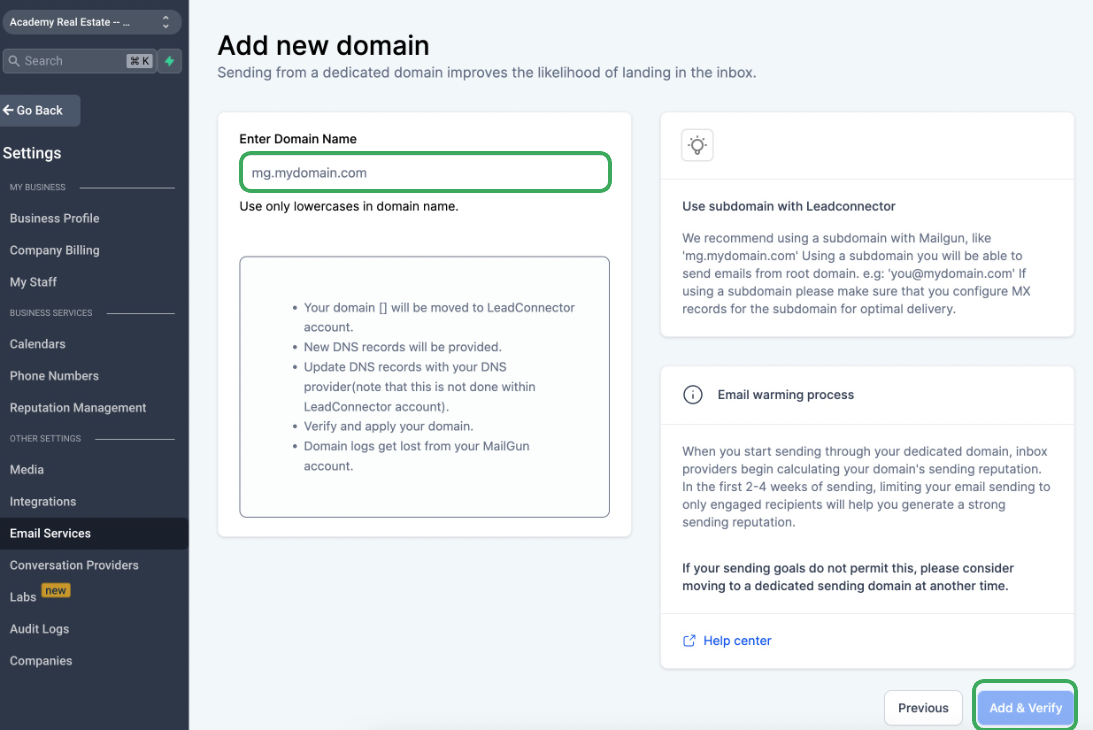
In your sub-account, go to Settings → Email Services → Dedicated Domain and click + Add Domain.

If your domain is companyname.com, you can register either the root domain or a subdomain as your dedicated sending domain.
Main domain (companyname.com) — must not already be in use with Google Workspace or another email provider.
Subdomain — enter any prefix before your root domain, for example replies.companyname.com or support.companyname.com.
If you use Google Workspace to send and receive mail on your root domain (e.g. user@companyname.com), you must use a subdomain here. Adding the root domain will conflict with your existing Google Workspace MX records. See Can I use the same domain for Mailgun and Google Apps?
After entering your domain name, click Add & Verify. The next screen will display the 5 DNS records you need to add. Keep this tab open — you will copy values from it in the steps below.

Migrating from Mailgun? See How to move a sending domain from Mailgun to LeadConnector.
Open Google Domains DNS
In a new browser tab, log in to domains.google.com, click into the domain you are setting up, then click DNS in the left panel. You will add all 5 records here.

Do not click Save after each individual record. Add all 5 records first, then save once at the end.
Add the 1st TXT Record (SPF)
Click Create new record in Google Domains and fill in the fields below.
Google Domains appends your root domain automatically. Enter only the prefix part:
- Setting up lc.companyname.com → enter lc
- Setting up replies.companyname.com → enter replies
- Setting up root domain companyname.com → enter @

Select TXT from the Type dropdown.
Paste the following SPF record value exactly as shown:

Do not click Save yet. Click Create new record to continue to the 2nd TXT record.
Add the 2nd TXT Record (DKIM)
Everyone's 2nd TXT record hostname and value is unique to their domain. Copy both values directly from your platform's DNS records screen — do not use values from screenshots in this article.
Select TXT from the dropdown.

Look at the 2nd TXT hostname in your DNS records screen. Copy only the portion before your root domain name. The examples below show which part to copy.

| Scenario | Copy this as hostname | Example |
|---|---|---|
| Using a subdomain | mx._domainkey.helpdesk |  |
| Using the root domain | mailo._domainkey |  |
Paste the full 2nd TXT record value from your platform's DNS records screen. This value is unique to your domain — copy it as-is from the highlighted field.

Do not click Save yet. Click Create new record to add the MX records.
Add MX Records
Click Create new record in Google Domains and fill in the fields below.
If you have a Google Workspace account that sends and receives mail on your root domain, adding MX records to the root domain will break existing email. Use a subdomain for LC Email. See Can I use the same domain for Mailgun and Google Apps?
Same logic as the TXT records — enter only the subdomain prefix:
- lc.companyname.com → enter lc
- replies.companyname.com → enter replies
- Root domain companyname.com → enter @

Select MX from the dropdown.
Paste the first MX value, then click + Add more to this record and paste the second:


Do not click Save yet. Click Create new record to add the final CNAME record.
Add the CNAME Record
Click Create new record in Google Domains and fill in the fields below.
The CNAME hostname is prefixed with email. followed by your subdomain prefix:
- lc.companyname.com → enter email.lc
- replies.companyname.com → enter email.replies
- Root domain companyname.com → enter email
Select CNAME from the dropdown.


You have now entered all 5 DNS records. Proceed to Section 7 to save and verify.
Save & Verify Your Domain
Now that all 5 DNS records are entered, click Save in Google Domains.
Switch back to the platform tab and click Verify Domain on the Email Services screen.

DNS propagation can take a few minutes. Click Verify Domain again after waiting a moment. If records remain unverified after 10+ minutes, double-check the values you entered in Google Domains against the platform's DNS records screen.
Once all records show a green checkmark, your dedicated sending domain is active. Next, confirm your SSL Certificate for Dedicated Sending Domain (LC Email) is properly set up.
Then send a test email to confirm everything is working. Learn how to send a test email in the Conversation.
Frequently Asked Questions
Was this article helpful?
That’s Great!
Thank you for your feedback
Sorry! We couldn't be helpful
Thank you for your feedback
Feedback sent
We appreciate your effort and will try to fix the article