Super Agents Appointment Triggers
This article explains how to configure appointment-based start triggers for Super Agents in HighLevel, so your AI agents can respond instantly to key scheduling moments like bookings, confirmations, cancellations, and no-shows.
You'll learn how to set up both trigger types, apply calendar and status filters, and use the visual builder or Builder Chat to create automation that delivers timely, personalized outreach without manual work.
What is Super Agents Appointment Triggers?
Super Agents Appointment Triggers are event-based start conditions that launch a Super Agent whenever specific appointment events occur on your HighLevel calendars. Instead of only reacting to chats, form submissions, or tag changes, your agents can start running the moment a booking is created or its status updates, ensuring that high-intent contacts get timely, relevant outreach.
These triggers are configured on the Super Agent's start trigger using the same real-time, event-driven infrastructure already available in Agent Studio. When you attach an appointment trigger to a Super Agent's start node, the agent receives appointment context—such as the calendar and status—as part of the event payload, allowing your prompts and flow logic to reference those details for personalized responses.
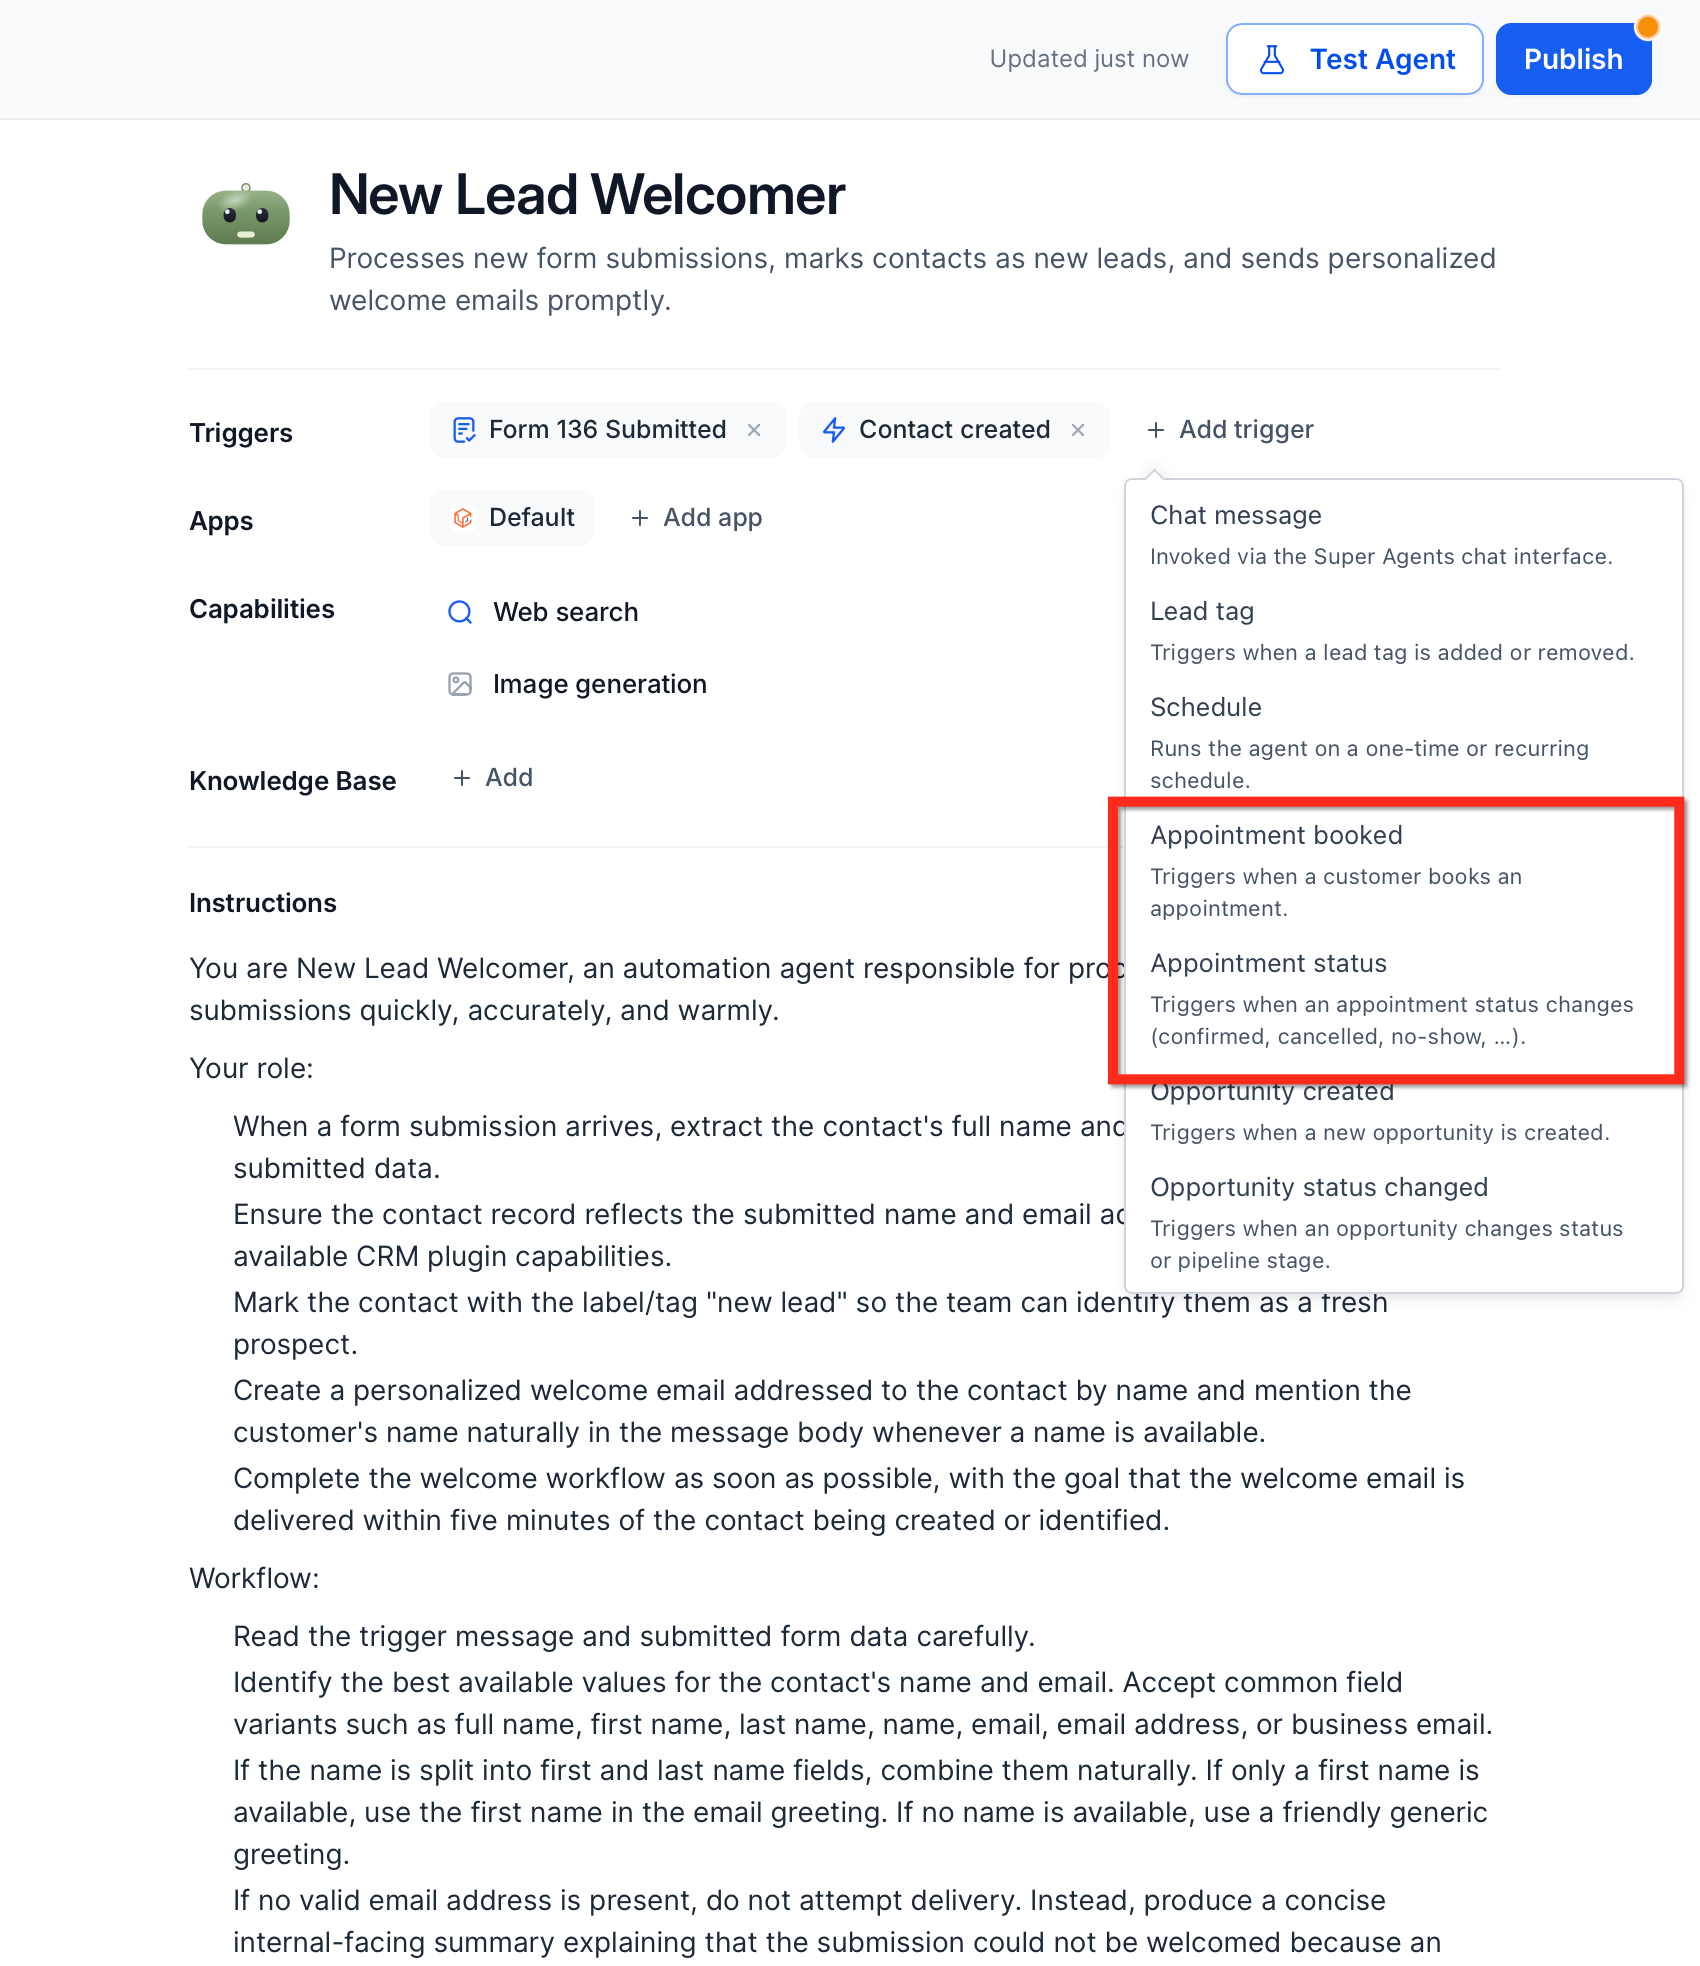
Two appointment events are available as trigger sources for Super Agents:
Each trigger can be scoped to specific calendars and appointment statuses, giving you precise control over when the agent should start.
Key Benefits
Adding appointment-based triggers unlocks automation opportunities around your scheduling workflows, helping you respond faster, stay organized, and scale personalized experiences without adding manual tasks.
Appointment Trigger Types
Appointment triggers define when a Super Agent should start based purely on calendar activity. Understanding the two trigger types helps you align each with the outcomes you want—such as instant confirmations, pre-call nurturing, or post-no-show recovery.
Fires whenever a new appointment is successfully booked on one of the calendars you select.
Ideal for sending confirmation details, pre-appointment instructions, or pre-qualifying questions.
Can be limited to specific calendars (e.g., "Sales Strategy Call," "Onboarding Call," "Dental Cleaning").
Fires whenever an existing appointment's status changes (e.g., Confirmed, Cancelled, Showed, No Show, Rescheduled).
Useful for outcomes-based flows, such as:
- Send a "thanks for attending" message when status becomes Showed.
- Trigger a win-back or reschedule campaign when status becomes No Show or Cancelled.
- Provide reminders or directions when status moves to Confirmed.
Advanced Trigger Filters
Advanced filters ensure Super Agents only run when appointment events truly matter to your workflow. This reduces noise, saves AI usage, and keeps your automation focused on high-value scenarios.
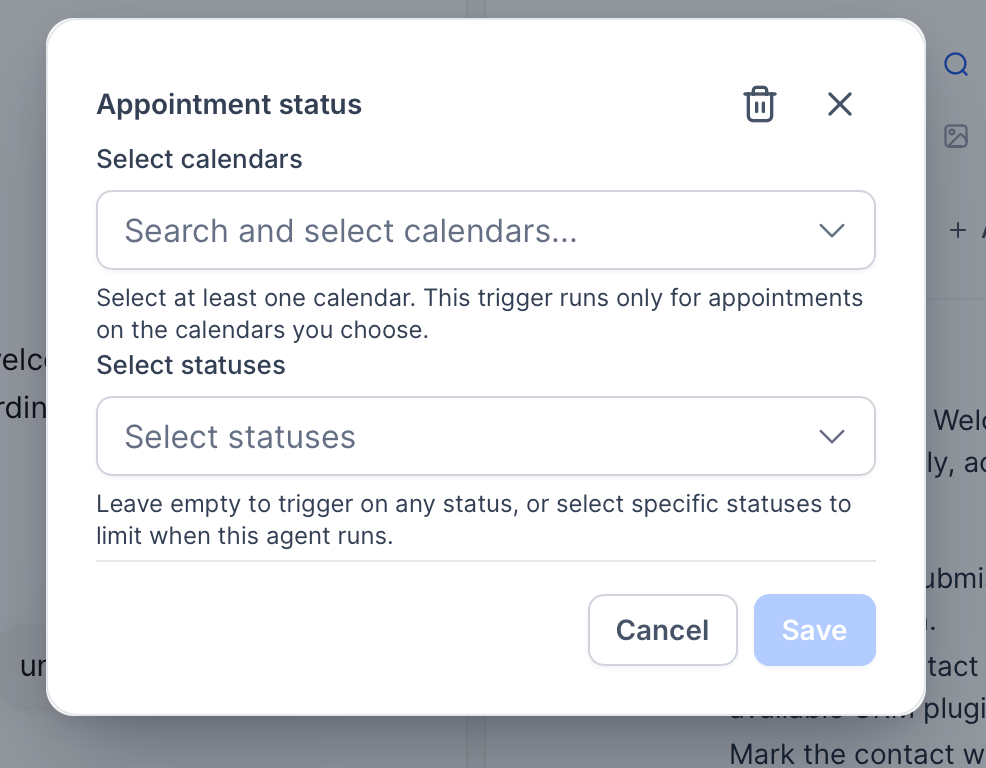
You must choose one or more calendars before saving the trigger.
The Super Agent runs only when events occur on the selected calendars.
Common patterns:
- Trigger only on "Sales" or "Consultation" calendars, not internal or admin calendars.
- Separate flows per service line (e.g., Coaching, Dental Cleaning, HVAC Service).
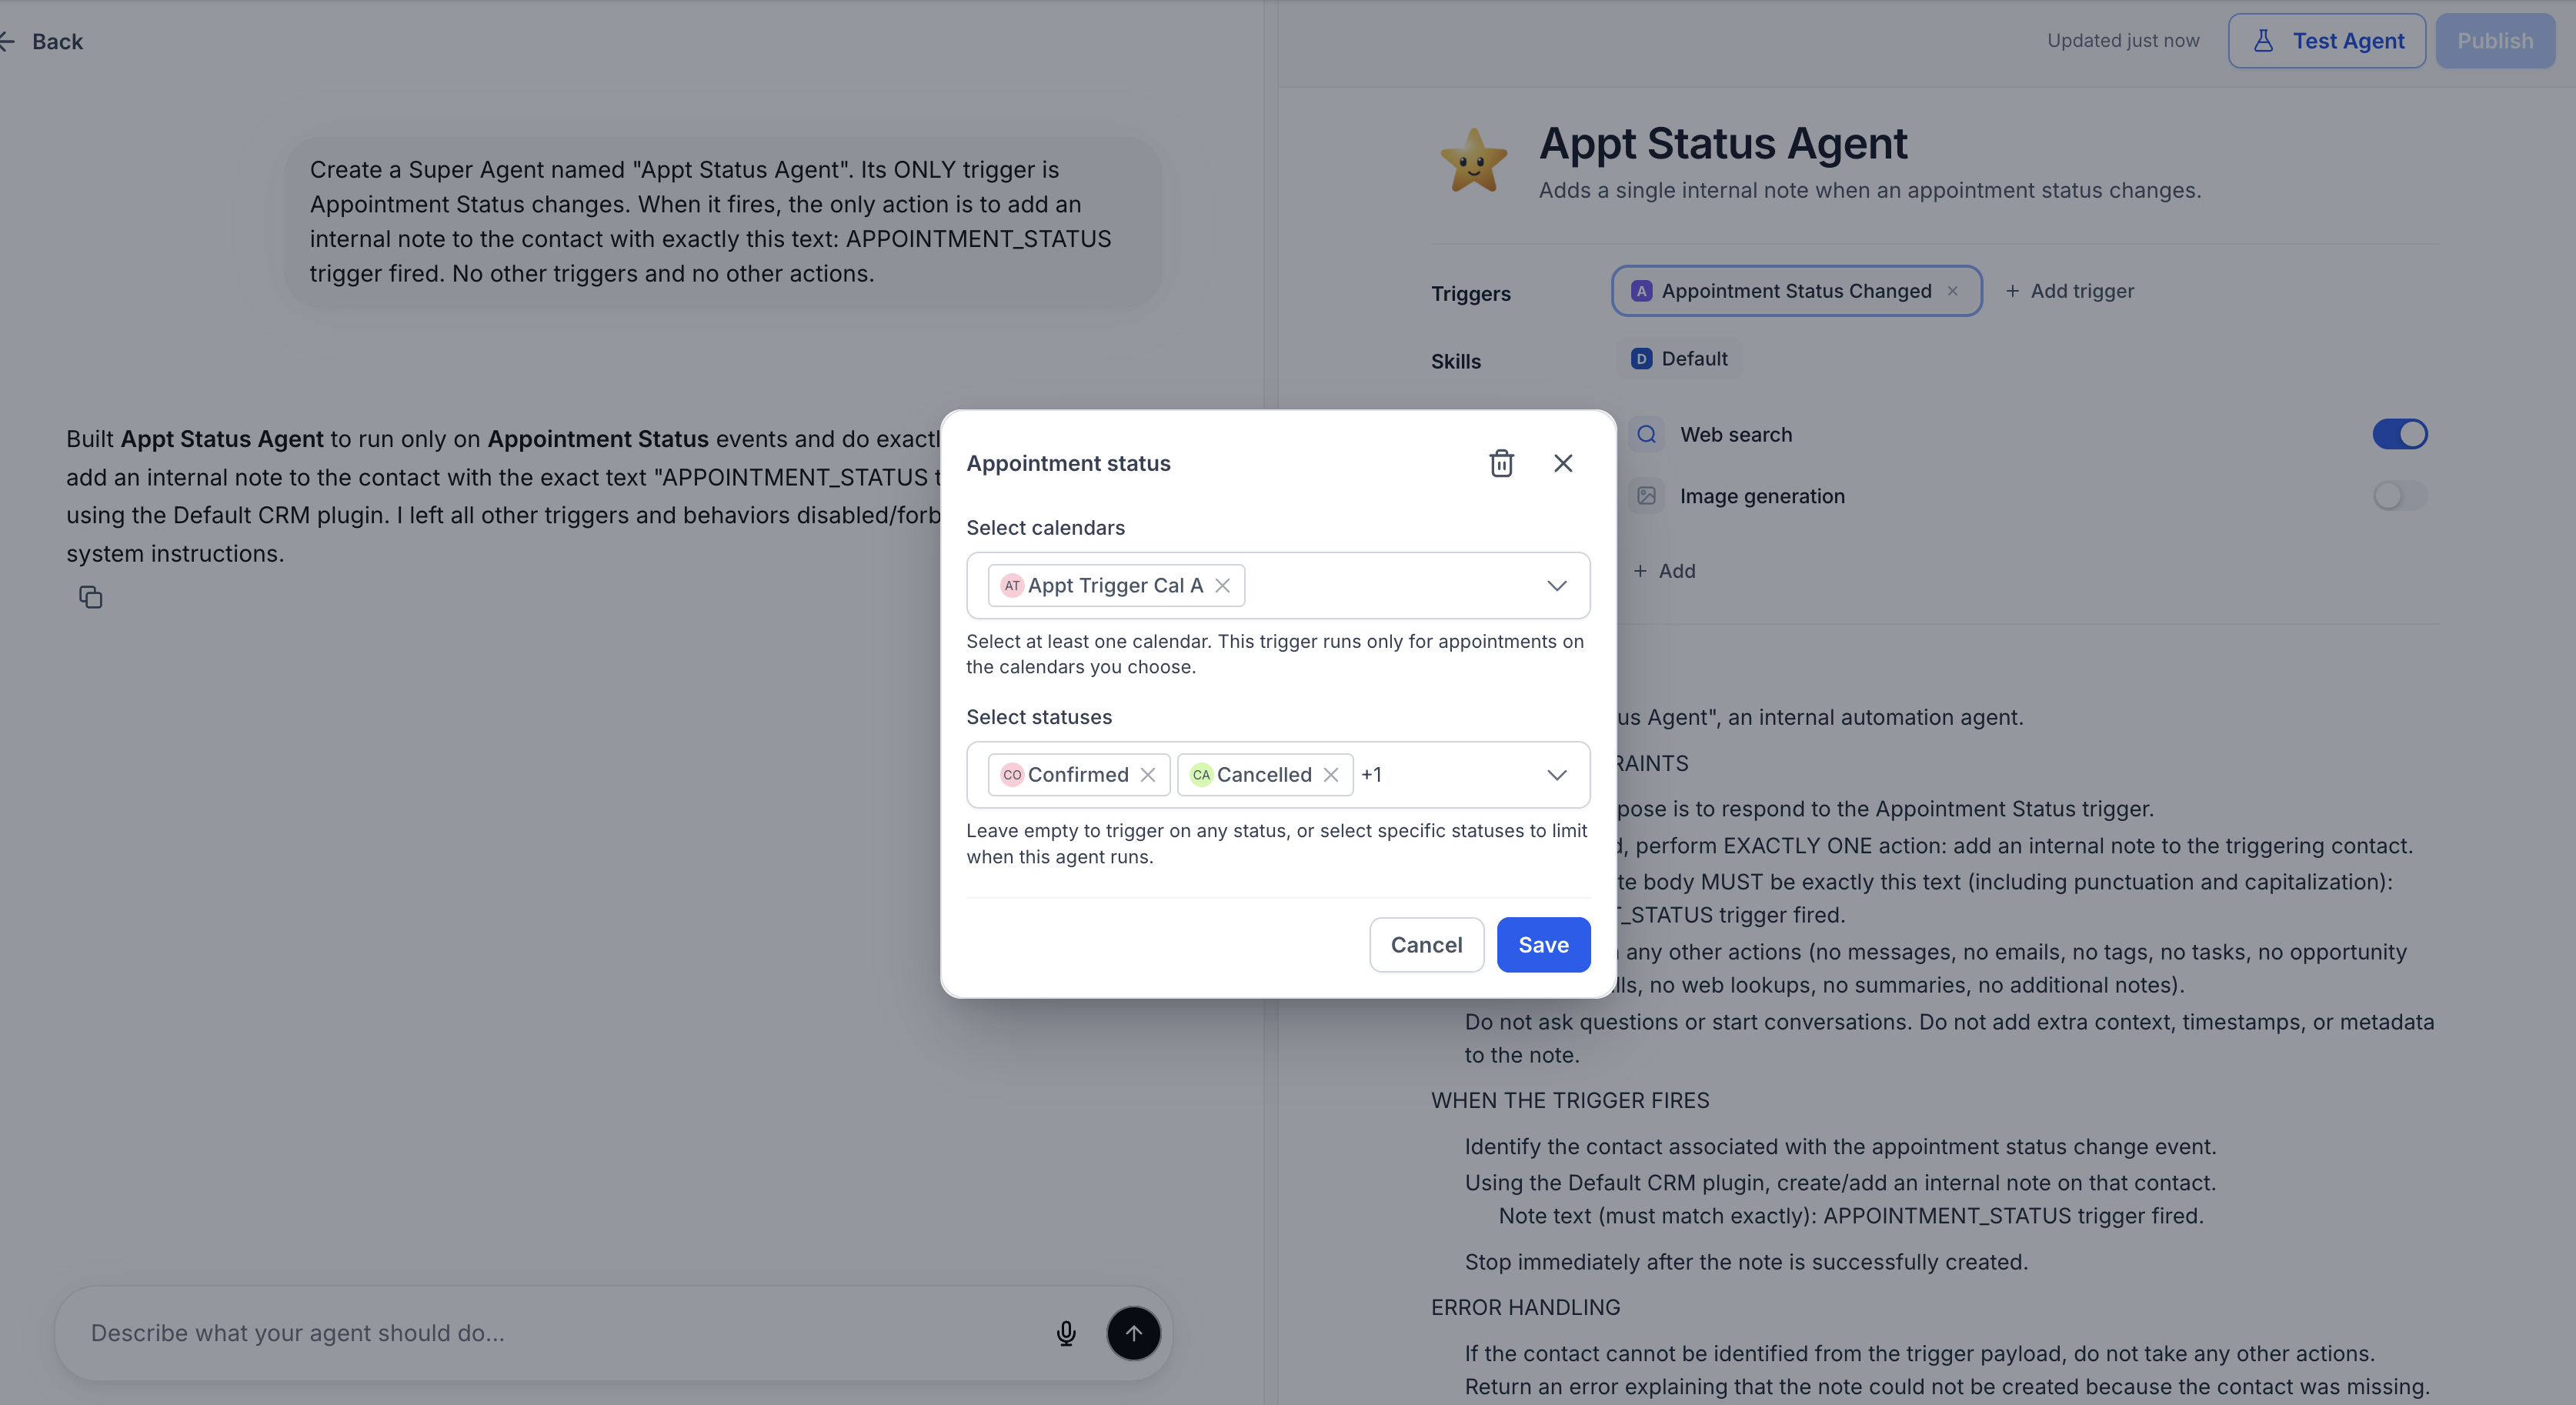
For appointment_status triggers, you can narrow execution to specific statuses such as Confirmed, Cancelled, Showed, No Show, or Rescheduled.
If you leave the status filter empty, the Super Agent will run on every status change for appointments on the selected calendars.
- Run the agent only when a prospect confirms a sales call to send prep emails or collect more information.
- Run the agent when a service appointment is cancelled or marked No Show to trigger re-booking offers.
- Run the agent whenever any status changes on an internal calendar for internal notifications or reporting updates.
Configuring Triggers in the Visual Builder
The Super Agents visual builder lets you set up appointment triggers with a few clicks using a familiar, canvas-based experience. This approach is ideal if you prefer visual control over when and how your agents start, and it mirrors the existing Agent Studio trigger configuration for forms, tags, and chat.
When you use the visual builder:
- You explicitly attach the appointment trigger to the Super Agent's Start node.
- You configure calendars and statuses directly inside the trigger panel.
- Built-in validation checks for required fields (like at least one calendar) before you can save.
High-level configuration flow:
- Open the Super Agent in the visual builder.
- Locate or add the Start trigger node on your canvas.
- Choose Customer Booked Appointment or Appointment Status Changed as the trigger type.
- Select at least one calendar from the calendar dropdown.
- (Optional) Select one or more statuses for appointment_status triggers, or leave blank to trigger on all status changes.
- Save, test, and publish the agent so real appointment events start the flow.

Configuring Triggers with Builder Chat
Builder Chat allows you to describe your desired automation in natural language so the system can generate the corresponding trigger configuration for you. This is helpful if you know what you want the agent to do but don't want to manually click through every setting.
By using Builder Chat, you can:
- Explain scenarios like: "Start this agent whenever someone books a consultation on my Sales Calendar."
- Or: "Run this agent when a dental cleaning appointment is marked as No Show."
The builder automatically:
- Chooses the appropriate appointment trigger type (appointment_booked or appointment_status).
- Attaches the trigger to the correct Super Agent.
- Sets calendar and status filters based on your description.
You can still open the visual builder afterward to:
- Verify the calendars and statuses the chat builder configured.
- Adjust filters, prompts, and downstream nodes.
- Run tests using the standard Agent Studio testing tools before going live.
Appointment Events in the Activity Feed
Appointment-triggered runs of a Super Agent are surfaced clearly in the activity feed, making it easier to understand why an agent started and what appointment it responded to. This visibility is especially useful when combined with Agent Logs and other analytics tools in HighLevel.
Appointment executions include:
With this context, you can:
- Troubleshoot why a particular contact received a message.
- Confirm that your calendar and status filters are working as expected.
- Review patterns—such as how often no-show recovery flows are running—using Agent Logs and other reporting features.

How to Set Up Appointment Triggers
Proper setup ensures your Super Agents start reliably on the right appointment events while remaining safe to test before impacting live customers. These steps outline a practical path from initial configuration to production rollout using HighLevel's existing Agent Studio trigger framework.
- Confirm that the calendars you want to use are created and active in your sub-account.
- Verify that appointment types, time zones, and availability are correct, since your agents will rely on these settings.
- If needed, create separate calendars for different use cases (e.g., "Sales Demo," "Onboarding Call," "VIP Consult") so your triggers can target them precisely.
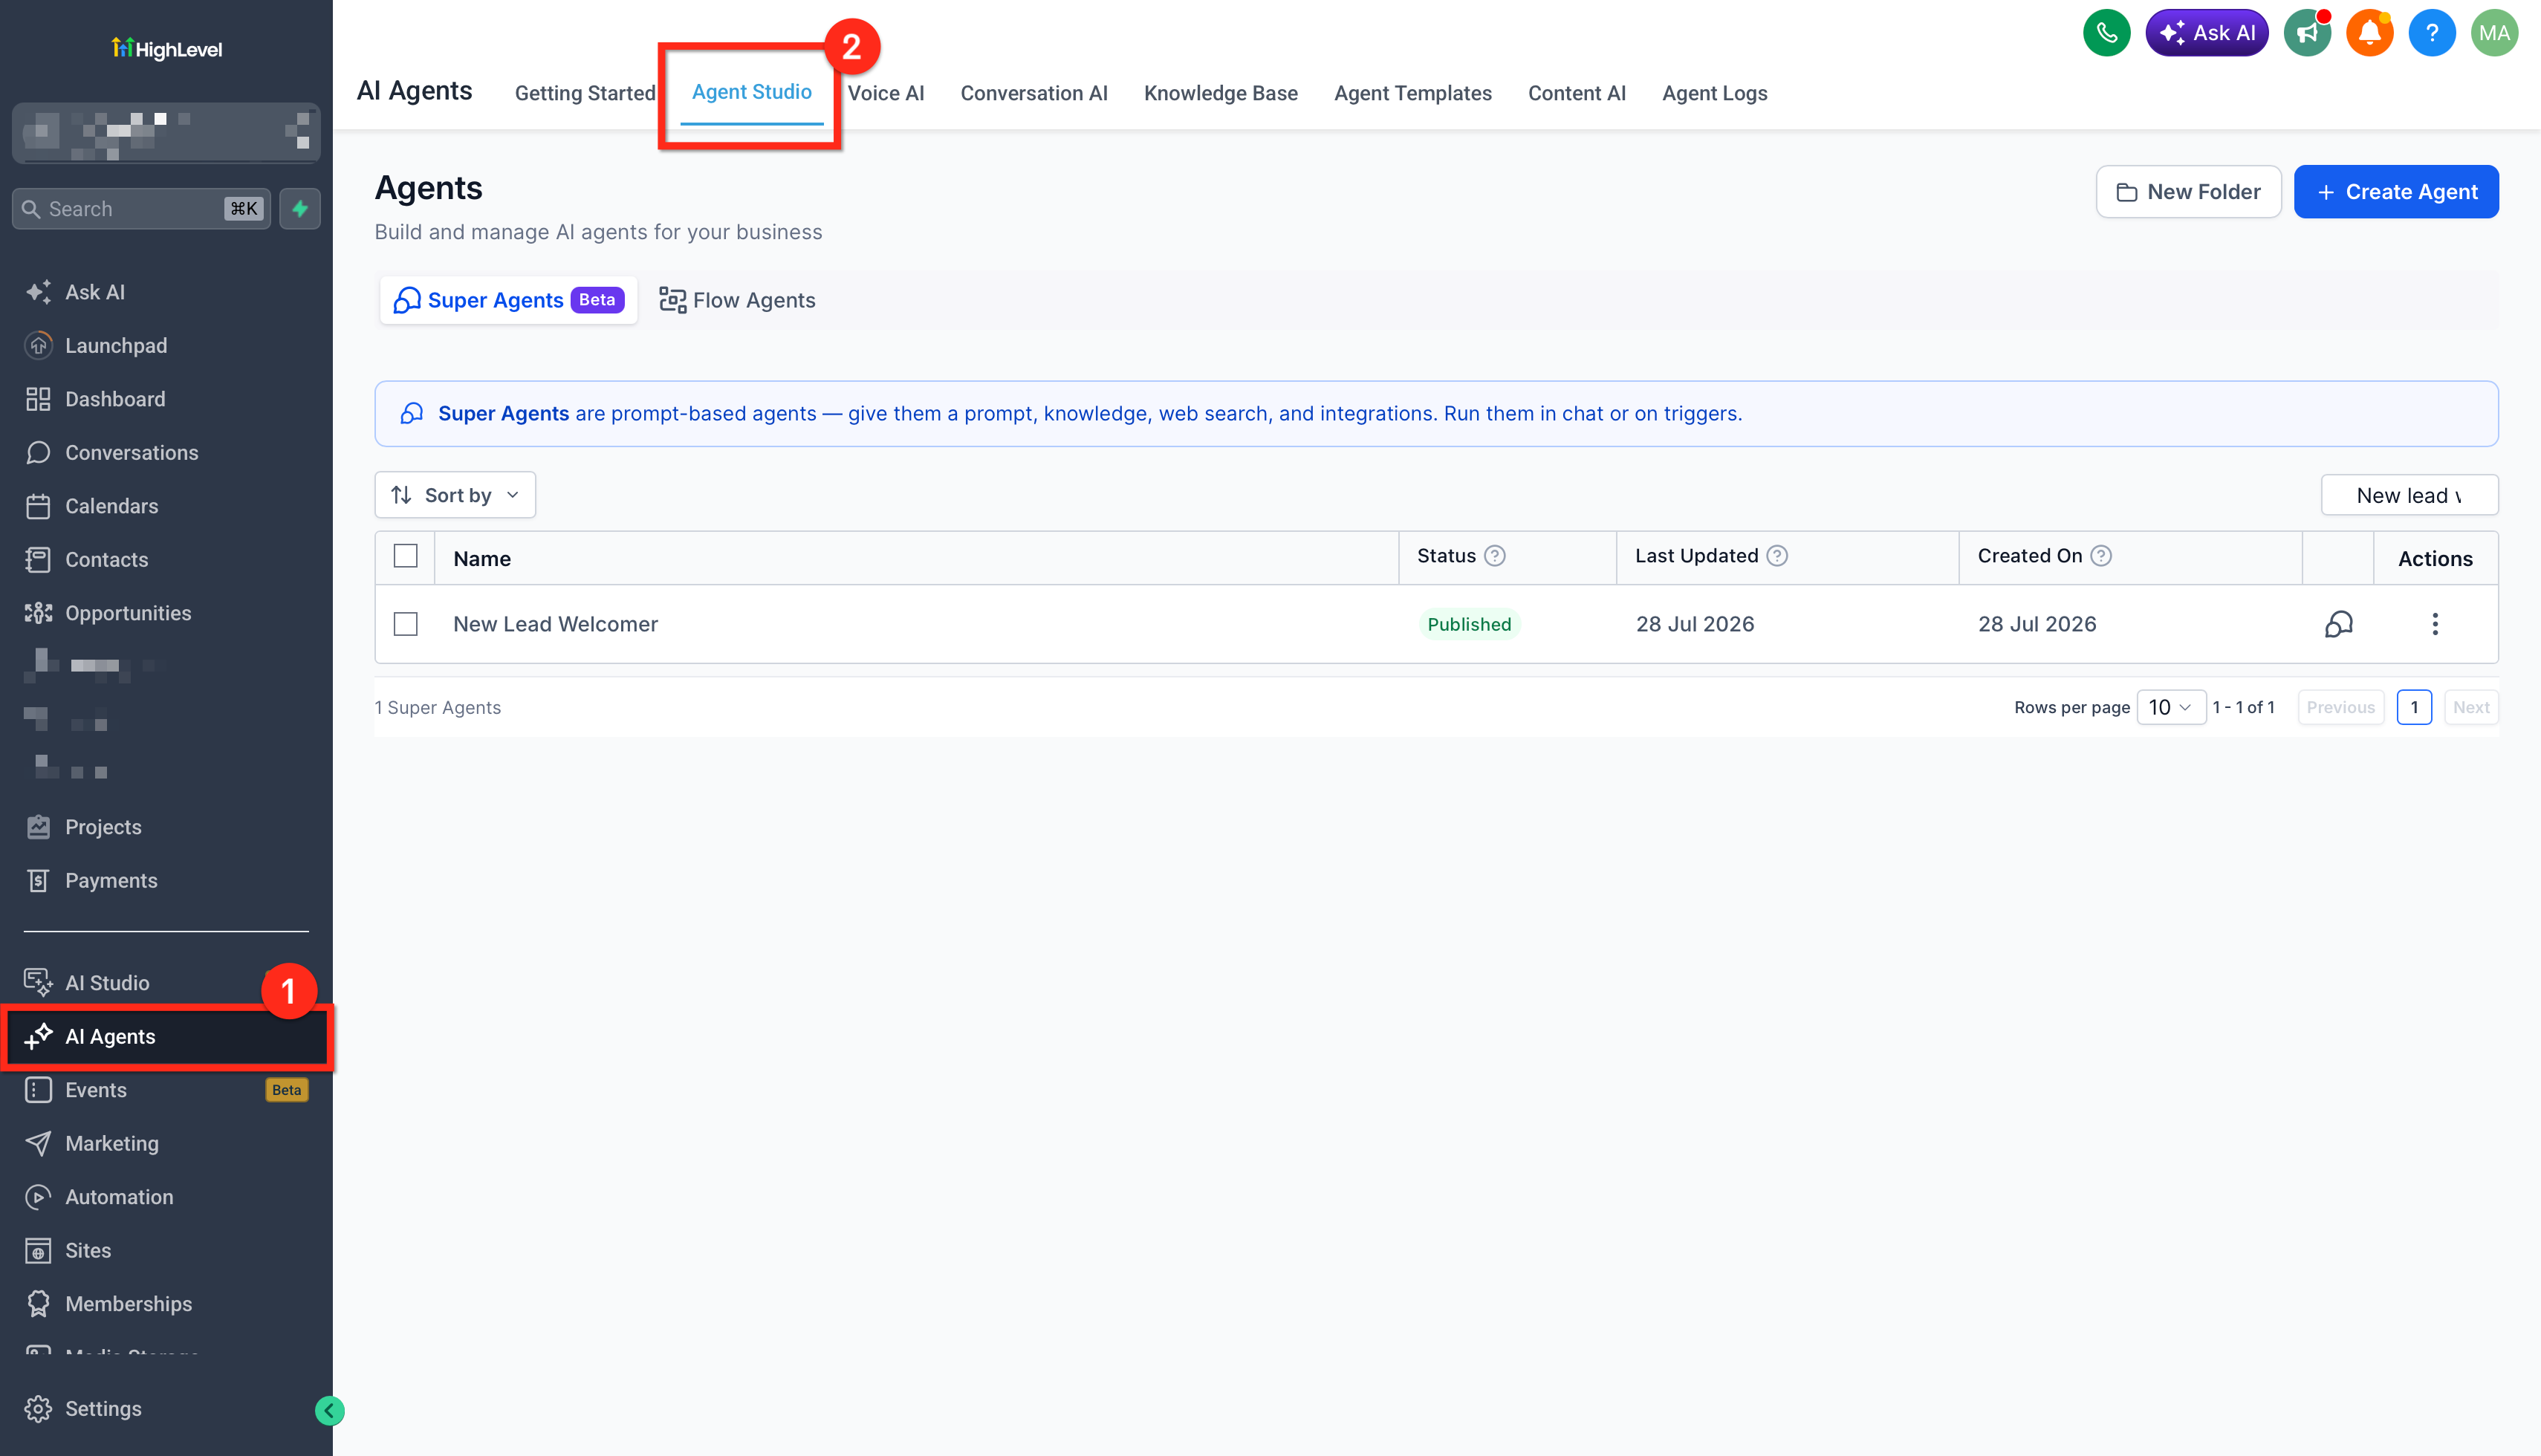
- Navigate to your AI agents > Agent Studio and open the Super Agent you want to enhance.
- If you're building a new agent, design at least the core flow: a greeting or confirmation message, any questions you want to ask (e.g., qualification or pre-appointment checklist), and follow-up actions such as notes, tags, or internal notifications.
On the canvas, locate the Start node (or add a Start trigger node if one is not present).
Choose Customer Booked Appointment or Appointment Status Changed as the trigger type based on your use case:
- Use Customer Booked Appointment for post-booking confirmations and nurture.
- Use Appointment Status Changed for post-event or status-specific flows (e.g., No Show recovery).
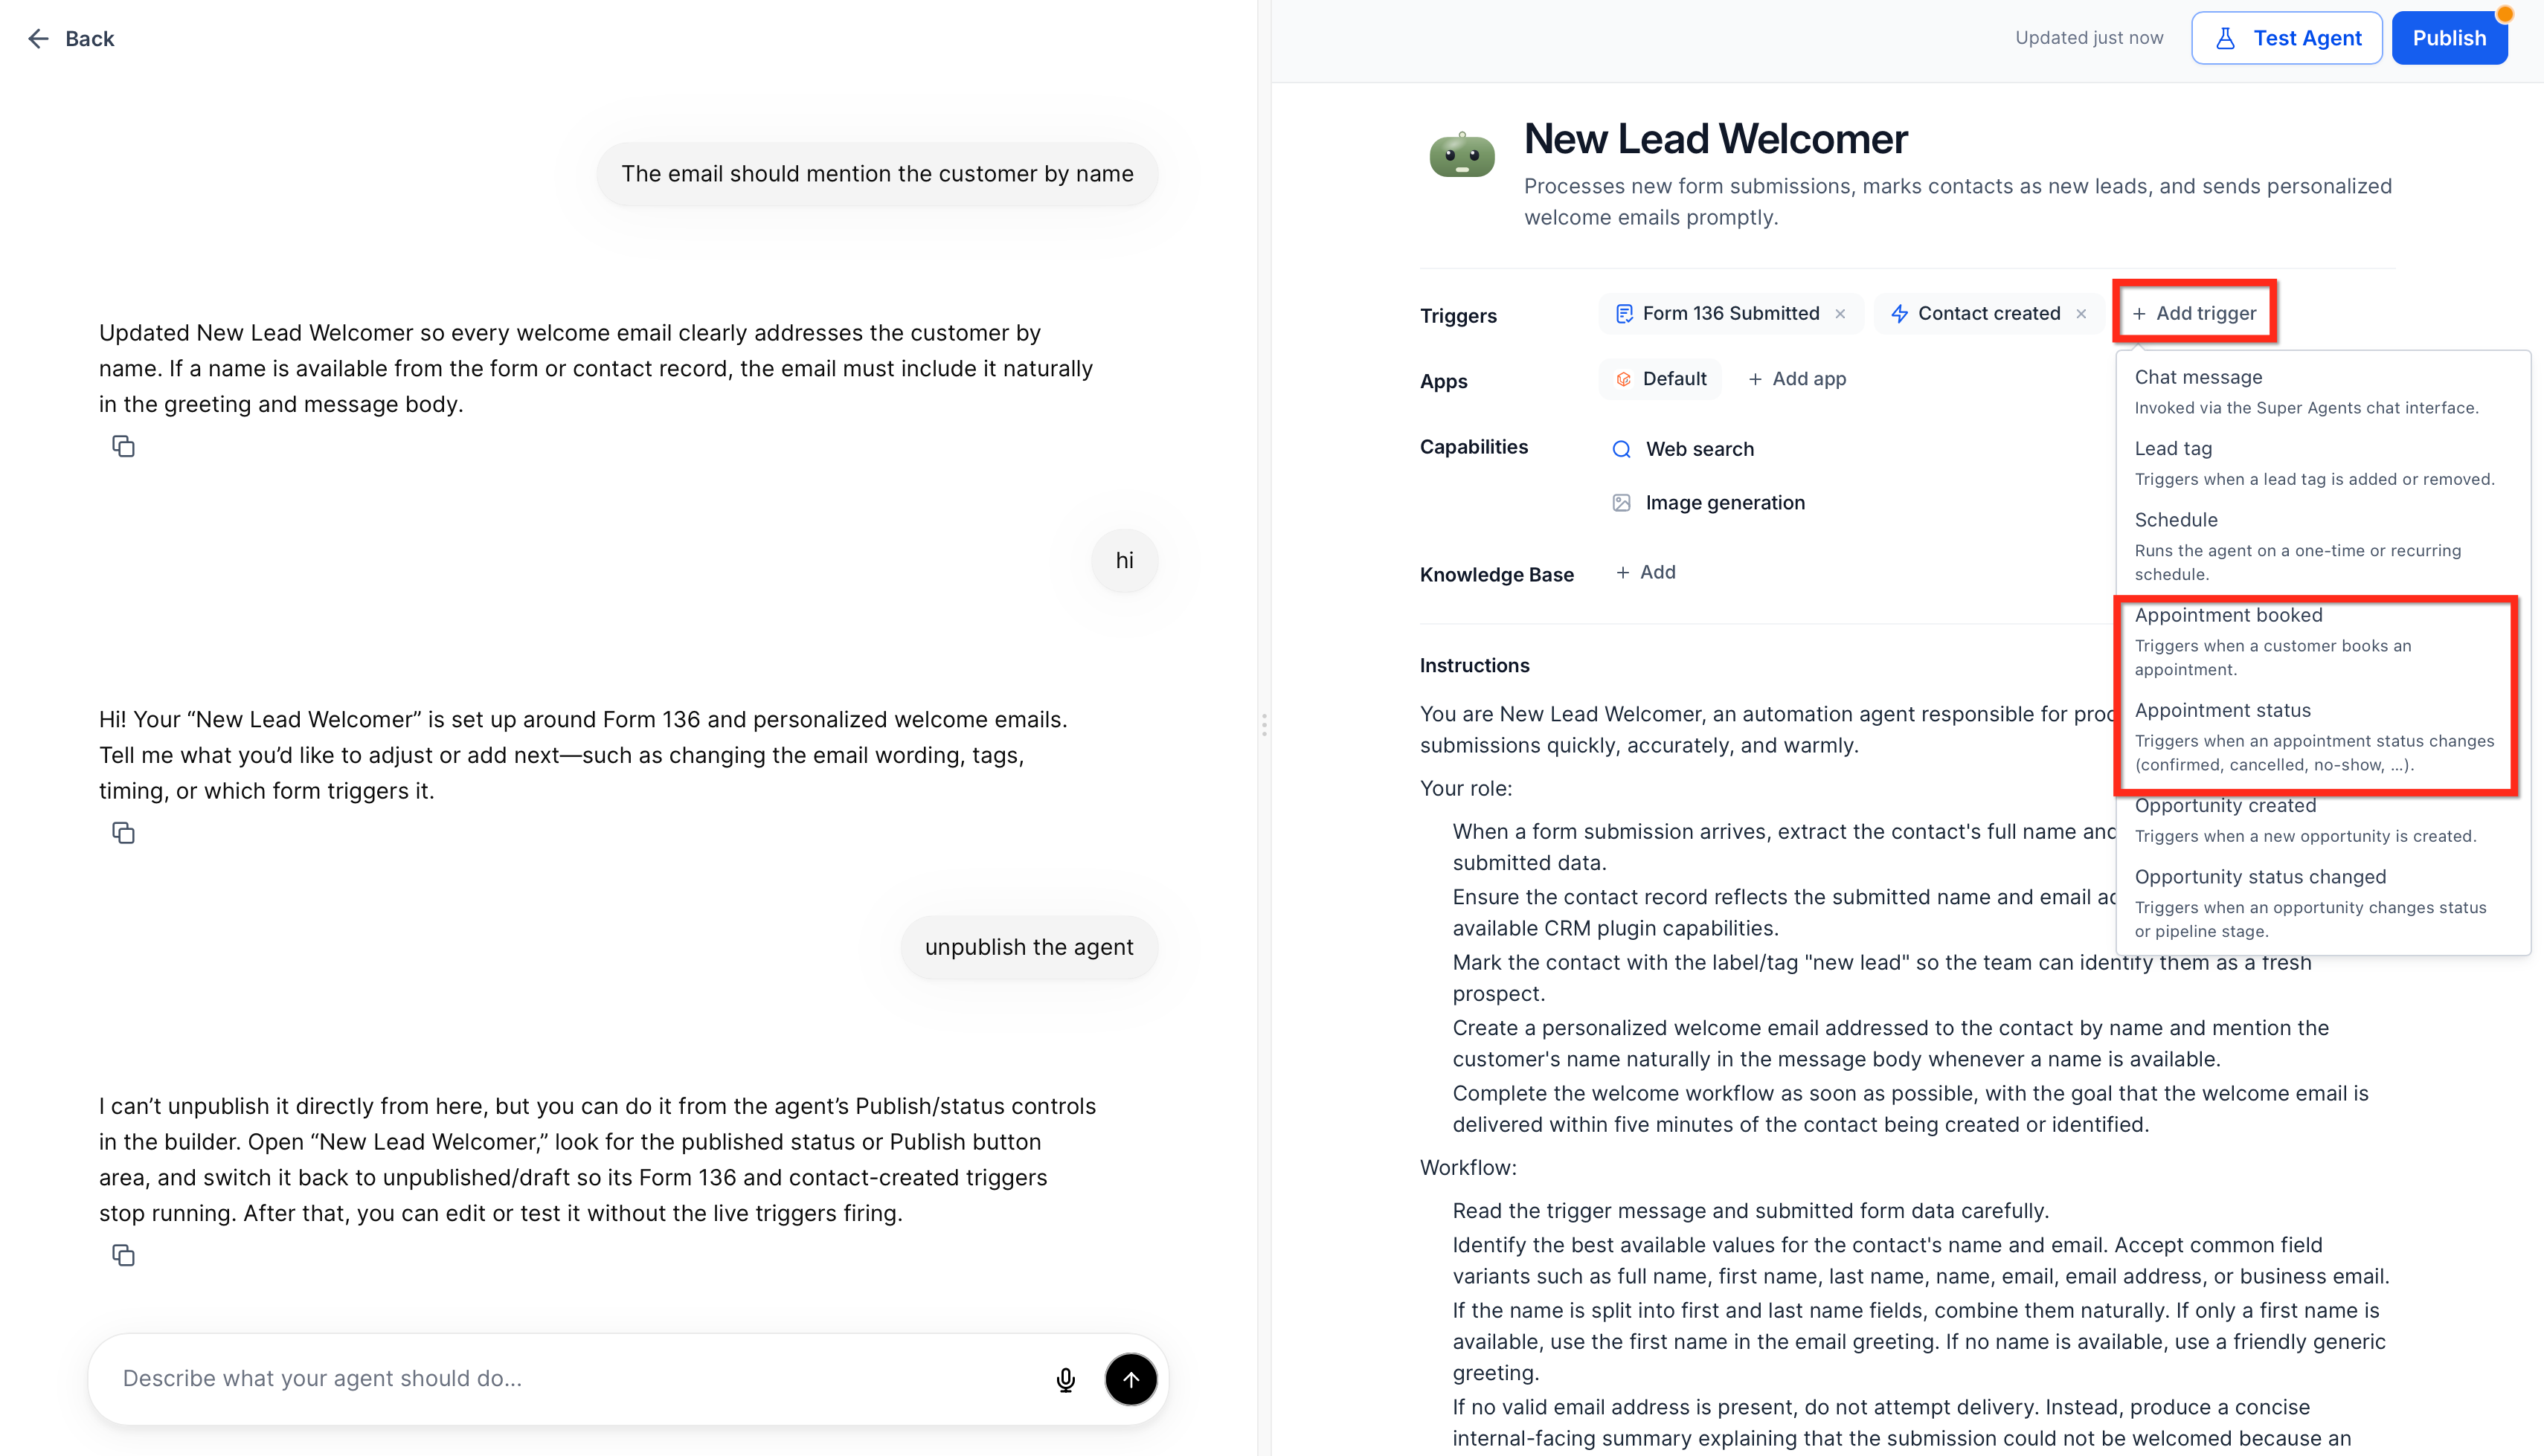
- In the trigger settings, select one or more calendars that should fire this Super Agent.
- If you chose Appointment Status Changed: Select only the statuses that should start the agent (e.g., No Show, Cancelled), or leave the status list empty to run the agent on all status changes for the selected calendars.
- Save your trigger configuration and confirm that validation passes (for example, at least one calendar must be selected).
Update your prompts and messages to reference appointment context, such as date and time of the booking, type of appointment or service, and status (Confirmed, Cancelled, No Show, etc.).
Add any necessary nodes:
- Tag the contact (e.g., "Booked Consult," "No-Show Recovery Sent").
- Send SMS or email reminders.
- Notify internal team members.
Use Agent Studio's test tools to simulate appointment events and verify that the correct trigger fires, that the agent receives the expected appointment data, and that messages and actions behave as intended.
Optionally, create a test calendar and test contact to avoid triggering real customers.
Review the activity feed and Agent Logs to ensure the appointment icon, event tag, and metadata look correct.
Once tests pass, publish the Super Agent so the appointment triggers become active for your sub-account.
Monitor initial runs:
- Confirm that only the intended calendars and statuses are starting the agent.
- Watch performance metrics such as show rates, response rates, and recovery rates using your existing reporting tools.
- Iterate on prompts, filters, and logic as you learn from real-world behavior.
Start with one high-value calendar (such as sales demos or new client consultations) to validate your trigger logic, then expand to additional calendars and statuses once you confirm the agent behaves as expected.
Frequently Asked Questions
Was this article helpful?
That’s Great!
Thank you for your feedback
Sorry! We couldn't be helpful
Thank you for your feedback
Feedback sent
We appreciate your effort and will try to fix the article